Search

LadiesandTech

DIY for electrical/automation/mechanical/PLCs/Crafts and so much more……

Category

The Creative Tech Stuff

Front Yard 50th Birthday Sign

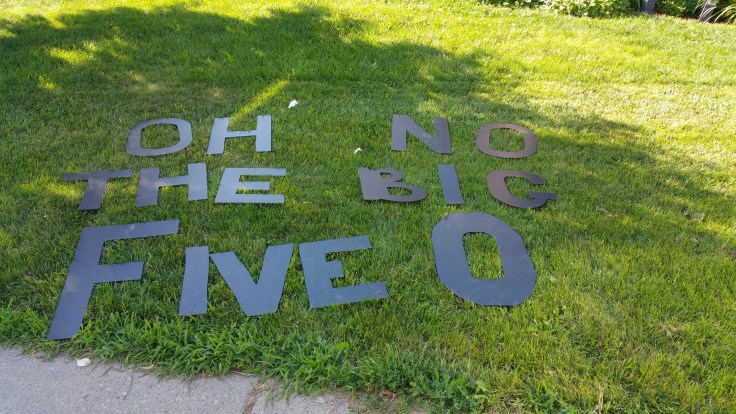
I couldn’t find the perfect birthday sign for a dear friend so like always I decided to make one. The sign had to be able to stand up to the outside elements and be big enough to be read by the neighbors across the street. So I decided to make the sign out of polyethylene plastic materiel that comes in 4′ x 8′ x 1/8″ sheets.

First I drew the size of letters I wanted unto the polyethylene plastic, making sure they were big enough to be seen from the road.20150723_123605

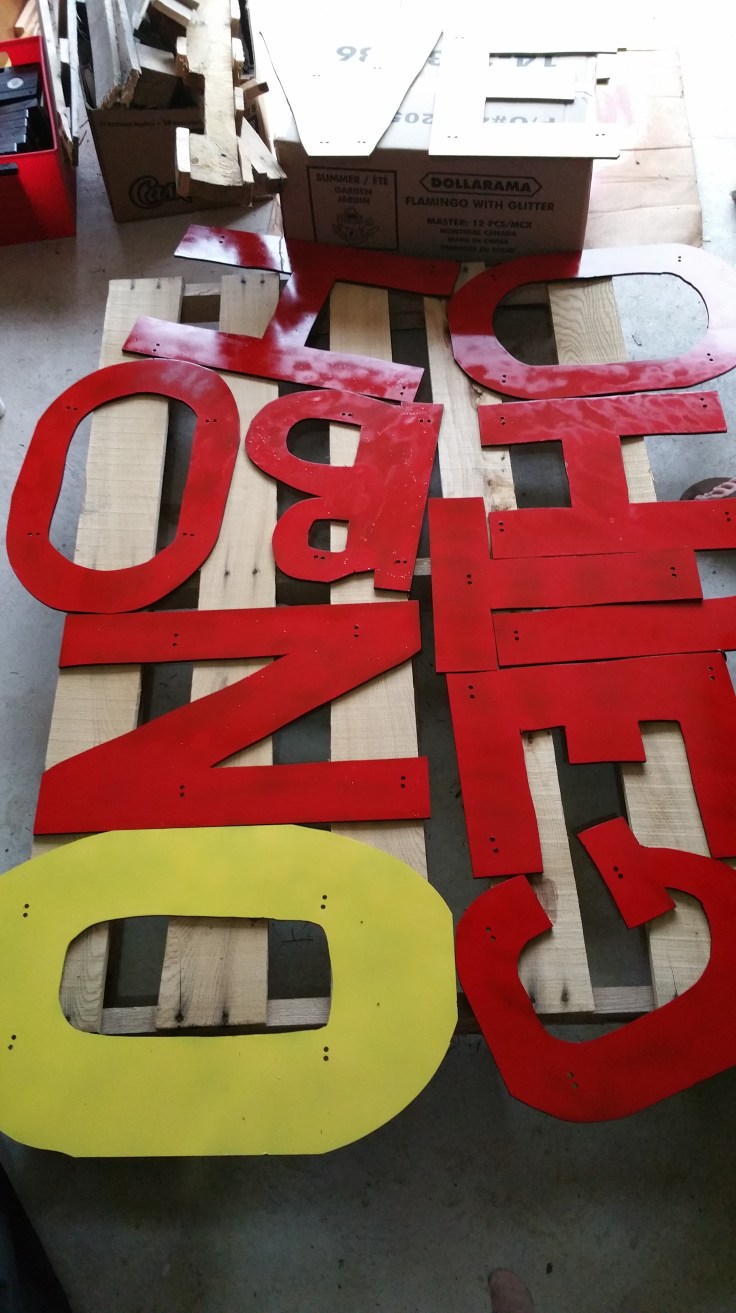
Using a SKIL 4395-01 5.5 Amp Orbital Jig Saw I cut out the letters I drew on the polyethylene plastic.


20150723_125536


20150723_180619

Once I cut out all the letters I drilled holes for anchor points to attach the letters to the poles that I used to stick in the ground and hold up the sign. I painted the letters. You can also paint the letters any colour you, but ensure you use a paint that will adheres to plastic. I used Krylon Fusion Spray Paint for Plastic pumpkin orange gloss


20150810_162838

Let the paint dry for a few days or as long as the paint direction state.


20150810_174413

Then attach letters to rods or sticks that will be stuck in the ground.  I used bamboo sticks and zip ties.

That is it totally easy and a super fun surprise!!! Now you can have a Awesome Surprise for all your friends Birthdays.

thebigfive0thumb

Easy Canning Salsa

Fresh vegetables in the fall are my favorite. Today I opened a can of salsa that I canned using fresh vine ripened tomatoes from my back yard and it was so amazing that I had to share the recipe with you. This is a super easy canning recipe, in fact this was the first thing I ever canned.

Yields 6 quarts or 12, 500 ml (pint jars)
What you need:  
               Tools
               Canning Jars - 500 mL  with lids and rings qty 12 
               Stock Pot, 8-Qu big enough to submerge the canning jars
               Canning Jar Lifter not a must but makes it easier

               Ingredients

               16 cups Tomatoes, peeled, chopped and drained
               2 cups jalapeno Peppers, chopped
               5 cups of onions, chopped
               4 cups of green peppers, chopped            
               1/4 cup of canning salt
               2/3 cup of sugar
               1 cup white sugar
               1 cup white vinegar
               1 can (15 oz) can of tomato sauce
               1 can (12 oz) of tomato paste
 *optional cilantro or extra jalapeno peppers
*If you have any left over tomatoes can them with a little vinegar they are
 great for making sauces.

First clean all your jars, lids and rings by boiling them for 10 mins or running them through the dishwasher using no dishwasher soap.  If there is anything in the jars it will contaminate your salsa.

jar boiling


Next gather all the ingredients and mix together in a stock pot. Bring to a slow boil for 10 minutes. Then fill jars making sure to stop 1/2 inch from the top of the jar. Wipe off the rim of the jar and put lid and ring on tight.

salsafillthejar


Water Bath

Place jars in rolling boiling water bath for 20 mins and ensure the jars are fully submerged in the water with 2 inch above the lids. If at any time the water stops boiling, start the process again. This is where a jar lifter comes in handy and saves your hands from being burnt. Make sure the lids have completely sealed by pressing down on the lid. The sealing of the lid may happen 20 mins after you take the jars out of the bath.  Make sure you label and date your jar. Wait 2 to 3 weeks and enjoy.

canboil

Sweet Potato Veggie Mix and Chicken

This is one of my family’s favorite dishes. This dish is so easy to make and could not get any simpler. If you are just starting to learn to cook this takes zero skill or if you are just looking for something easy to throw together and taste great, this is it. The sweet potato veggies mix is not only great with chicken, it can go with any main dish and you can easily customize to your liking.  If you don’t like sweet potatoes, add cut up white potatoes or better yet the small petite potatoes or try some different veggies like brussel sprouts and cauliflower.

For this receipt you will need the following:
 Ingredients
 2-3 Sweet Potatoes
 2 heads of Broccoli
 4 cups of carrots (1 lb bag of whole carrots will be more then enough)
 Olive Oil 3 table spoons
 Table Salt
 Pepper
 Chicken Quarter fresh or if frozen increase cooking time accordingly
 Club House Roasted Garlic and Pepper One Step Seasoning 144gm, 6-count or spice  of your choosing
 Tools:
 Chopping knife
 Cutting Board
 Cooking Pan (I prefer my glass 9 1/2 X 11 but a cooking sheet will work)

  1. Preheat the oven to 375°.

2.  Clean carrots,sweet potatoes, and Broccoli.

carrotcleaning


3. Cut carrots and sweet potatoes into no more then 1 inch cubes. Cut broccoli into   pieces.

cutcarrots

brocolliCut


4. Put cut potatoes and vegetables into cooking pan.

5. Pour olive oil, salt and pepper over the sweet potato veggie mix and stir mixture so that the oil, salt and pepper cover most of the potatoes and veggies.

20151207_163655

6. Place in the oven for 35-45 min or until the potatoes are cook thoroughly. You will know the potatoes are cooked if they are soft enough to squish with a fork.

7. Place Chicken in cooking pan.

8. Sprinkle on roasted garlic and peppers seasoning or a seasoning of your choice on the chicken quarters.

roastedredpepper20151207_164232


9. Place in oven and cook for 45-50 mins or until chicken is fully cooked.


That is it, so easy!!!!


ENJOYchickenSweetPotatodish


How To Stop Mice From Wrecking Your Stuff

When putting our boats, RVs, cars or anything anyway in storage we expect it to be safe. Until the unthinkable happens….mice or chipmunks or some other woodland creatures have decided to make our precious toys their home.   What a mess they make and the clean up and the damage repair can be costly. Not a good way to start a season.  We have all tried moth balls. Sometimes they work but they have let me down before. Also the smell of moth balls are how you say less than desirable, even the cedar ones.

For the last 5 years I have used essential peppermint oil to keep my boat vermin free when storing it for the winter. Yes that is right peppermint.  Not only is peppermint an excellent deterrent to vermin it makes your boat, RV, car and anything else you like to protect smell minty fresh.

What you need: 
                 Peppermint Essential Oil
                Clean rag
                Small tin container

Cut your rage to fit the bottom of your tin container.

rag.png

Place rag in the bottom of your tin container. I used a small meatloaf type container, it was no more then 5 inches long. Next pour the essential peppermint oil over the rag, making sure the rag is all damp. Since you are using an essential oil the liquid will not evaporate. The oil could stain materials. Make sure to use a open tin, metal or glass container so that the oil does not seep through.

20151018_111344

Place a container every 7 to 10 ft inside boat/RV/car etc.  For a car I would put one inside the car and one in the trunk.

That is it, your precious toy is protected and you will love the peppermint smell when you take it out of storage!!!


Super Easy Pickled Banana Peppers

So I just opened a jar of banana peppers that I canned this fall, they are amazing!!  I must share this super easy canning recipe so you can enjoy them as well.

I had never canned before but this method is so easy and can be done in a snap.

peppersfinished

What you need:  
               Tools
               Canning Jar - 250 mL - Vintage with lids and rings qty 4-6 
               Stock Pot, 8-Qu big enough to submerge the canning jars
               Canning Jar Lifter not a must but makes it easier

               Ingredients
               1 lb banana pepper
               5 cups white vinegar
               1 teaspoon celery salt
               1 teaspoon mustard seed
               1 cup white sugar
               *optional jalapeno peppers for added heat

First clean all your jars, lids and rings by boiling them for 10 mins or running them through the dishwasher.  If there is anything in the jars it will contaminate your peppers.

jar boiling


Next gather 1lb of banana peppers. I had plants in my garden and also went to the farmers market so I could gather peppers in varying shades of colours. The different colours looks great in the jars but not a necessity.

Peppers012

Clean and slice peppers into rings. Pack jars with sliced peppers. Then make the brine. Brine is the liquid goodness you pour over the peppers and fill the jar with.  Add the vinegar, celery seed, mustard seed and sugar together in a pot and bring to a boil. Pour brine over the peppers, making sure to stop 1/2 inch from the top of the jar. Wipe off the rim and put lid and ring on tight.

Water Bath

Place jars in rolling boiling water bath for 20 mins and ensure the jars are fully submerged in the water with 2 inch above the lids. If at any time the water stops boiling, start the process again. This is where a jar lifter comes in handy and saves your hands from being burnt. Make sure the lids have completely sealed by pressing down on the lid. The sealing of the lid may happen 20 mins after you take the jars out of the bath.  Make sure you label and date your jar. Wait 2 to 3 weeks and enjoy.


Reclaimed Metal and Wood table

We have all seen the left over frame from a broken glass table. I thought this would be perfect frame for our outside patio set table.  Instead of replacing the glass, I replaced the top with wood boards.

I purchased this black metal table frame from kijiji and 5 inch x 48 inch x 1/2 deck boards.

metalframe

Next I cut the boards to size to fit the table.

metalframeoneboard.png

Then I secured the boards to each other by placing a two boards on the underside of the table top and screwed into top boards.  Then I secured the new table top to the metal frame.

2015-12-10-23.38.14.jpg.jpg

To finish I applied a protective clear coat to the table top to protect it from the weather. I used a spray on protective coat.

2015-12-10-23.24.30.jpg.jpg

Nice and easy and it looks stunning!!!

2015-12-10-23.40.42.jpg.jpg

Reclaimed Custom Wood Signs

I just love all the wood signs with sayings of inspiration, whit, and love.  I could never find one that had the absolutely perfect saying for my loved ones, so I decided to make them their own custom signs.

First start by finding some reclaimed wood. I tried all the restores and had no luck. Then I found some old pallets.

pallet
Wood Pallet picture From Wikipedia

Next cut the pallet wood to the size you want the sign to be. Then secure the pieces together in the configuration shown below.  Make sure you per-drill pilot holes for your screws to avoid spiting the wood.

pallet back

Decide your colour scheme and start by painting your background.  When choosing paint keep in mind what material you are painting and what elements your sign will be subjected to.  For my sign I want to make sure I use a paint that will adhere to wood and can hold up to the outside weather. Water based pant is not a good choice to use unless you are using a really good sealant. Painted below is a rustic look that I created by applying a thin washed coat, not a thick layer of red paint. Doing this lets the wood show through.

paintpalletSign

Next picked out sayings and create stencils. I used an automated cutter that I borrowed from a friend. The possibilities of saying are endless when you create your own stencils!!! When the stencils are complete adhered them to the sign using tape.

stencelsPalletSign

When painting in the stencils hold them down to try to stop the paint from leeching underneath.

palletsignletterspaint


When the painting is complete and dry (leave it over night to dry) spray on a sealant to protect the sign if it is used outside.

That’s it nice and simple and customized!!

badideagoodtimeedit

Here are a few more I did!!!

3pallet signs


Create a free website or blog at WordPress.com.

Up ↑